Showing posts with label Recipes. Show all posts

Sunday, October 25, 2015

Chicken Pie Recipe

A couple of years ago, in honour of a birthday present Le Creuset pie dish, I made a chicken pie that finally ticked all the boxes for my kids. Attempts back in the mists of time had left half the family lukewarm and, let’s face it, if you’re going to all the effort of making a chicken pie from scratch you want a few wows, some applause, at the very least a series of ‘yums’ running around the table. Finally however I’d found the right recipe for my family, creamy enough without being too rich, not too dry, no weird / scary vegetables lurking in the depths. That was a while back now and recently I started getting some less than subtle hints from the kids that they’d like another taste of that chicken pie.

A few weeks ago,  I finally had a few days without major writing deadlines, when I could abandon the computer early without a qualm, so I went looking for that chicken pie recipe as a starting point. Could I remember where I’d found it? I searched here on my blog, because if a recipe is that good the safest place to record it for posterity has to be here... only the failures came to light. Nigella’s pot pies may have wowed her children, but mine evidently have different tastes. I went back into Facebook archives to see if I’d mentioned it there. No joy. Finally I dusted off some recipe books languishing at the back of the pile under the kitchen counter (possibly two years worth of dust, it was hard to tell!) and finally found my source in Gordon Ramsay’s Cooking for Friends, given to me on the same birthday as the pie dish. I hadn’t followed the recipe to the letter, but it was what I’d based my successful pie on, so I was in business.

What I like about this recipe is that it uses the minimum of pots, just one in fact plus the pie dish, so you don’t end up with piles of washing up, and you could prepare most of it in advance quite easily and just post the pie into the oven in time for supper, if you were ever that organised. It’s also easy enough to substitute any vegetables that your kids find acceptable instead of the original mushrooms and baby onions that Gordon advises. I ended up using roughly chopped onions, carrots and potatoes because that was what I had, but peas could easily replace the carrots and, if I were making it for adults, leeks and mushrooms would be perfect too. Plus it’s relatively quick, apart from leaving things to cool before putting it all together.

Because I can see myself searching frantically  for the recipe again in another two years time, I’m posting my version here as a permanent reminder.


Chicken Pie Recipe

800ml chicken stock
2 sprigs thyme and bay leaf
500-600g chicken breasts
300g onion roughly chopped
200g vegetables chopped (potatoes, peas, carrots, leeks or mushrooms)
50g butter
50g flour
100ml milk or cream
1 egg yolk mixed with 2 teaspoons water
Pastry made from 250g flour / 125g butter / 6 tablespoons iced water or enough ready-made pastry to line top and bottom of a 23cm pie dish

Bring chicken stock to a simmer and poach the chicken breasts in it with the herbs for 10-12 minutes until cooked through. Remove the chicken to a plate to cool. Then chop into bite-size pieces.

Add onions to stock and cook for 5 minutes. Then add the rest of the vegetables according to size so that they are all cooked to al dente tenderness at same time. Remove to a plate to cool.

Boil the stock until it has reduced to about 1 ½ - 2 cups in volume. Tip it into a jug.

Melt the butter in the pot. Stir in the flour to make a thick paste. Keep stirring for about 3 minutes to cook the flour. Add the stock a little at a time, stirring in thoroughly until you have a thick smooth sauce.

Add the milk or cream, stir well and simmer, stirring often until the sauce is thick and creamy.

Mix together the chopped chicken, cooked veggies and sauce and leave to cool completely.

Line a 23cm pie dish with pastry. Add cooled filling in an even layer.

Beat up the egg yolk with water to make an egg wash. Brush a little around the edge of the pastry. Put the top layer of pastry on, trim and crimp the edges. Cut a cross in the middle. Use any trimmings to make decorative leaves to go on the lid if you wish. Brush the whole top with the egg wash.

Bake at 200C/400F for approx 35 minutes until the top is golden and the the filling is bubbling.


 Bon Appetit!


Wednesday, September 02, 2015

Garam Masala Recipe

Once quite by chance I bought the perfect garam masala mix. It was aromatic and light, but also had warm depth, the whole spectrum of spicy notes, high and low. Several favourite recipes became dependent on it... and then I finished the packet. And couldn’t find the same brand again, anywhere. I tried other brands but they were disappointing, with the subtlety and shading of a brick. Eventually after many requests for that spicy bean soup, whose vital ingredient was garam masala, I did what I should have done ages before, I googled garam masala recipes, found two which sounded right and made my own.

There is no such thing as a standard garam masala in India. Every family has their own combination of spices, some more aromatic, some milder, some hotter. So it’s up to you to find the balance that suits you. For me that was aromatic and relatively mild, enough pepper to tickle the taste buds but not enough to sear them, and chilli an optional extra to add to an individual recipe later. Cardamom, cinnamon, cloves, bay leaves, nutmeg provide the aromatics; black pepper, cumin, coriander and ginger the heat and depth.

The recipes I used as a guide were both Punjabi ones, advising you to dry the spices in the sun, once you’ve cleaned them all carefully. It was winter when I was making this, so I took the alternative option and lightly roasted the spices in a hot pan, one spice at a time, so that the smaller seeds didn’t burn. Then once they’d cooled, all I had to do was grind them up in the coffee grinder and inhale the gorgeous aromas.

(TIP: unless you like your coffee chai scented, you might need to grind a few coffee beans and discard them to get rid of all the spice oils before returning the grinder to coffee duty!)

So this is what I used for mine. Feel free to create your own version of garam masala and customise your Indian recipes. I’m never going to buy ready made garam masala ever again, that’s for sure.

Ingredients

½ cup coriander seeds
¼ cup cumin seeds
2 tablespoons cardamom seeds
2 tablespoons cloves
1 tablespoon black peppercorns
8 sticks cinnamon
4 bay leaves
1 nutmeg

Other things you can add: 1 star anise, 1 inch dried ginger, mace.

Once you’ve ground up the spices, store them in an air-tight jar and use within a few months, otherwise they lose their aroma and you might as well have bought that sadly flat, dull brand from the supermarket.

Two favourite recipes that are totally dependent on really good garam masala: my Persian bean soup, and Madhur Jaffrey’s sag aloo.

P.S. Just in case you’ve been wondering where I was in August (thinking of you here, Marcheline, as my most attentive reader!), it was somewhere exciting and I’ve got a ton of photos to sort through before I share some of it here... hint, there were huge sand dunes and lots of wildlife.

Sunday, March 22, 2015

Harvest and a Recipe for Tomato Soup

It’s our autumn festival tomorrow – the time when we celebrate harvest, the earth and all the good things that come from it. Most years our harvest is a dim memory by now – the strawberries long gone, almonds harvested a month ago and the veggie garden almost bare, struggling to keep going at this end of the summer and thirstily waiting for the winter rains to bring it back to life.

Not this year. This year we are groaning under a super abundance of tomatoes. I’ve been making Jane-Anne’s roast onion and tomato soup in large batches until my freezer is full of it. I’ve been peeling and dicing tomatoes for the freezer. I took a box full to the last Camphill market and sold most of them. I’ve been picking whole baskets every single morning and giving them away to friends. Our staff have been taking home as much as they can carry. And still there are more.

It's messy and overgrown with grass but those falling down tomatoes are tasty!

I think we might have planted just a few too many tomato plants for our needs! But it is wonderful to have lovely rich tasty tomatoes to squander guilt-free in large quantities on soups and sauces. If I were a diligent farmer’s wife I would have been canning them and already have enough for a year’s supply. But I don’t have those proper canning jars and all the online canning gurus insist on new lids and proper seals, so I’m hesitant about trying it with recycled jam jars. So instead I freeze chopped tomatoes, tomato sauce and tomato soup until there is no more room, and then think of who else I can give tomatoes to!


One thing is for sure, we’ll be eating tomato soup at our festival tomorrow, plus salad from the garden and maybe a spinach and feta quiche. So the feta isn’t from the garden but the spinach is. And we need to use up all our frozen guava puree from last year’s harvest to make room in the freezer for this year’s guavas, which will be ripening from the end of next month onwards, so it will be guava fool for pudding.

Edited to add: I didn’t get round to posting this on Friday, so it’s a day after the festival, which I’ll post about separately. Friends from Camphill came over on Friday evening and we filled four big buckets of tomatoes for them to take back and share around the village. And still there are more tomatoes begging to be picked!


Tomato Soup Recipe
A roast tomato and onion soup is a fantastic way of getting plenty of oomph out of ripe tomatoes (see link above for Jane-Anne's fabulous version). I was going to make a huge batch for our festival yesterday, but Eskom decreed otherwise, so I had to come up with a stove-top adaptation. It worked and had plenty of flavour, even though it was slightly subtler, and didn’t need the addition of stock to let it down at all. This is it in a rough version. Feel free to change quantities.

6 medium onions peeled
2 tablespoons olive oil
2 tablespoons butter
20 or so ripe tomatoes, halved
1 tablespoon sugar
1 tablespoon wine vinegar
Salt and pepper to taste.

Cut onions into quarters and then eighths.
In a large pan heat the butter and olive oil, add the onions and sugar and cook, stirring occasionally until they are softening and starting to caramelise.
Do let them catch on the bottom towards the end to get that caramelly depth.
Add the vinegar and stir.
Add in the tomatoes with  a seasoning of salt and pepper, stir well.
Cover the pot and leave to cook at a medium/low heat until everything is tender, 45 minutes to an hour).
If you don’t have electricity, process through a mouli-legumes, otherwise a liquidiser will do!
Check the seasoning and consistency. If it’s too thick let the puree down with some vegetable or chicken stock - mine was just right as is, but it depends on the juiciness of the tomatoes and length of time cooking.


Thursday, February 12, 2015

Ginger Nuts Recipe

There’s something about ginger nuts. Nowhere near as glamorous as a chocolate biscuit, lacking the festive credentials of shortbread or the kid-appeal of Zoo biscuits, the ginger nut has nevertheless held its own in the biscuit barrel for more than 100 years, sneaking into the shopping basket even when times are tough and choccy biccies beyond the budget.

It’s plain enough to be an everyday, morning cup of tea dunking biscuit, perhaps that’s its secret, and its humble unassuming demeanour conceals a spicy punch to the palate.

Recently I was feeling restless, wanting to bake something different, but nothing too fancy. Ginger was the flavour on my mind, and riffling through my recipe books I came across Delia Smith’s recipe for Ginger Nuts. Instant decision. No weird ingredients, all pantry staples and easy to throw together.

I did wonder how close they’d be to the classic packet ginger nut, but they came out winners all round. Same crackle creviced top, good crunchy bite, dunk well and taste every bit as gingery.

The best thing is that being home-made they don’t have any hidden ‘bad’ ingredients – no e-numbers or questionable fats And the other best thing is that they are far more substantial and satisfying than a packet biscuit, so you don’t end up scoffing half the packet in one sitting.

I took one look at the recipe and doubled up the ingredients,  so if you don’t have a hungry flock of starlings to feed and are restrained in your ginger nut consumption feel free to halve the quantities back again.

Ginger Nuts recipe
220g / 8oz plain flour
2 teaspoons baking powder
2 teaspoons bicarbonate of soda (baking soda)
2 rounded teaspoons ground ginger
80g / 3oz brown or white sugar
100g / 4oz butter
4 tablespoons golden syrup

Oven 190C / 375F
2 greased baking trays

Makes about 32 biscuits

Sift together all the dry ingredients (flour, baking powder, bicarb, ginger, sugar).

Rub in the butter (doesn’t matter if it is soft or hard really, we’re not talking pastry here!)

Mix in the golden syrup and keep mixing until it comes together in a sticky dough.

Form the dough into small balls (the usual walnut size is about right – around 32 in all from this quantity)

Place the balls well spaced on the greased tray. Flatten slightly with a wooden spoon.

Bake for  10-15 minutes until they are a dark gold and firm at the edges. They will firm up more as they cool.

Leave to cool on tray for about 10 minutes then move to a wire rack to finish cooling.

Don’t eat them all at once, as they keep nicely in an airtight tin!


P.S. I'm just about to bake yet another batch this afternoon. Yesterday after school a daughter dipped her hand into the biscuit barrel and her face fell as it came out empty. So we need a constant supply in the house from now on to avoid those after school blues.

Monday, May 26, 2014

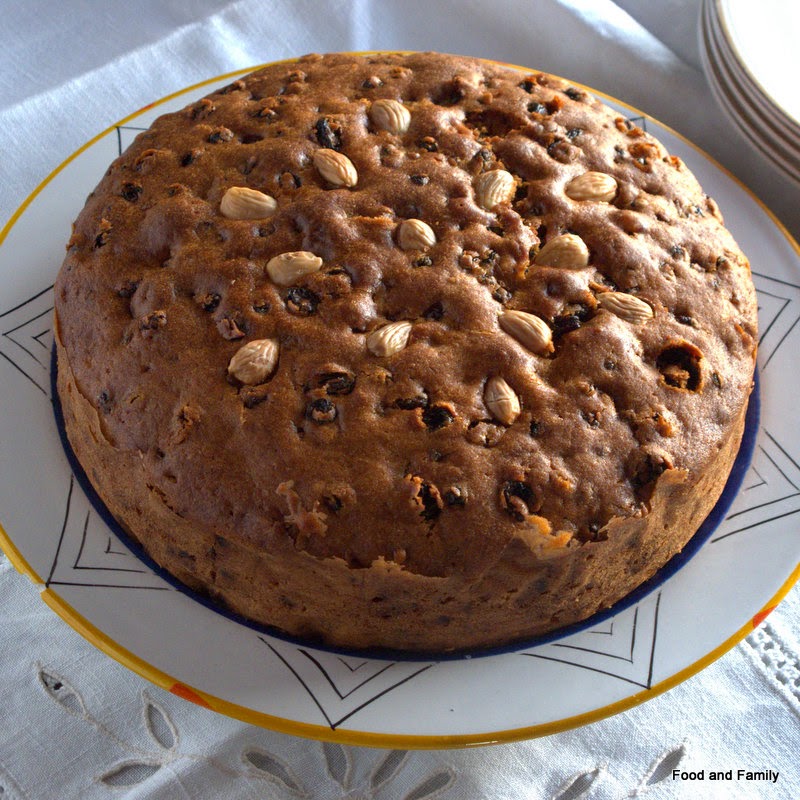
Plain Fruit Cake - No Icing Required

Is it just me that is fed up with cupcakes surmounted by voluminous froths of icing? Sometimes I feel like the Grinch when I have yet another request for cupcakes at school and I know that mine will be the humble Cinderellas of the parade... in my day (hrmph, bah humbug and all that) they were called fairy cakes and had a thin glaze of glacĂ© icing and some hundreds and thousands sprinkles for decoration. If you were going all out for glamour you could add silver balls or Smarties. While today’s elaborate creations are undeniably beautiful, I find the rich, very sweet icing overwhelming and would rather just eat the cake underneath.

I’m finding myself more and more attracted by the plain, un-iced cakes of old-fashioned tea-times. Not hotel teas or birthday teas but family weekday ones. The kind of cake that keeps all week in a tin and that you eat in front of the fire with a mug of tea, after having polished off the crumpets dripping with butter. When I was a child and we visited my aunt, there used to be two or three cakes on the go at any one tea-time. Usually a fruit cake, perhaps a ginger one and some sort of light sponge. We’d come in from walking the dogs and tea would be taken along to the sitting room on a trolley to have by the fire: bread and butter first, then a piece of cake or two and then biscuits to fill in any corners. I don’t know how we managed it all, as there would be supper a couple of hours later. Maybe the plethora of cakes was just when family was visiting, but I’m pretty sure that my aunt always had a cake of some description on the go. Here we go with the nostalgic childhood memories, I must be getting old!


My mum’s old-fashioned ginger cake recipe is a good un-fancy cake that lasts for days, and after our Easter Simnel cake was finished I went looking for a plain fruit cake recipe that would also do as an everyday cake. This Dundee cake recipe fits the bill perfectly. It’s light with a citrus freshness, and improves with keeping a few days. I thought about adding some spices to the mix, but am glad I resisted as the orange and lemon zest is all the flavour you need.


Dundee Fruit Cake recipe
Ingredients

150g/5oz soft butter
150g/5oz caster sugar
3 eggs, beaten
225g/8oz plain flour
1 teaspoon baking powder
450g/1lb fruit cake mix (sultanas, currants, candied peel)
2 tablespoons ground almonds
Grated zest of 1 lemon and 1 orange
50g/2oz whole blanched almonds
2-3 tablespoons milk (if needed)

20cm/8 inch cake tine, greased and lined
Preheat oven to 150C/300F

Cream together butter and sugar until light and fluffy.
Add eggs, a little at a time and beat in well.
Sift together flour and baking powder. Carefully fold it into the mixture.
The mixture should now be of a soft, dropping consistency. Add  a couple of tablespoons of milk if too stiff and dry.

Fold in the dried fruit, ground almonds and zest.
Spoon mixture into the lined cake tin and level with the back of a spoon.
Gently place the whole almonds in a circular pattern on the top of the mixture. Avoid pressing down, as the cake will rise up to meet them!

Bake until the centre is firm and springy and a skewer comes out clean, about 2 hours.
Cool in the tin, then store in an airtight container.

What about you? Do you have any favourite plain cake recipes to share?

Monday, May 19, 2014

It Ain’t Cornish, But It’s A Pasty

Cornish pasties are one of those food conundrums. Born as a convenient and rather humble packed lunch for those out working in the fields or mines, with no pretensions to grandeur, they are now a cherished part of the Cornish heritage and guarded by a PGI (Protected Geographical Indication), with heated debate and irate comments lathered around the web under any recipe that dares to call itself a Cornish pasty, if it breaks any one of the number of rules. One of those rules being that it has to be made in Cornwall, I’m putting a disclaimer in right from the start. This is not a recipe for a Cornish pasty.

I’ve broken too many other rules in creating a tasty version of a pasty anyway; the most important of them is that I’ve used carrot instead of swede – a huge No No among the defenders of the Cornish pasty heritage. In fact I’m wondering if when we visit Cornwall next we’ll be met by a pasty posse at the River Tamar and be refused entry on the grounds of defiling the reputation of the pasty. (Oh and don’t tell anyone Cornish, but I used mince rather than chopped beef skirt here, because it’s easier and cheaper and after all I’m making a meal for the family here, not re-enacting a historical event.)

Another hotly-defended rule that I’ve kept to, is that the pasty should be crimped along the side, not over the top (which is apparently a habit of those in the next county along, Devon). If you want to adapt this recipe to make the genuine article, you’ll need to use finely sliced beef skirt and swede, rather than mince and carrots, then, as long as you are in Cornwall at the time, you may be justified in calling it a Cornish pasty!

My latest pasty showing my best efforts at crimping

So with all that said, my main aim was to find a pastry recipe that would do the job. It needs to be strong enough to hold the filling and be easily transportable without breaking open, with a hint of a flake for lightness once you bite in. Don’t even think of using puff pastry here though, you want the firmness and crispness of shortcrust. I tried several recipes before coming up with one that I think is just right and my investment in really good lard paid off. Now I just need to find a more affordable source of that homely fat and convince the kids that it’s not too gross for words!

All in all the pasties were a big success with whole family and are a wonderful example of how you don’t need fancy ingredients to make something really scrumptious.

Cornish pasties are a D-shape, crimped at the side. This is my second attempt with rather dodgy crimping!


Not a Cornish Pasty Recipe
Ingredients
Pastry
500g white bread flour
100g lard
45g butter
5g/1 teaspoon salt
175g iced water

Filling
350g beef (mince or finely sliced skirt)
350g potato
200g carrot
200g onion
Salt and pepper
25g butter
Beaten egg to glaze

Makes 6 pasties

Rub the lard and butter into the flour until it resembles breadcrumbs. Gradually mix in the cold water and knead until it comes together in a pliable dough. You may need slightly more or less water depending on your flour.

Roll the pastry into a long cylinder shape and wrap in clingfilm. Chill for at least an hour in the fridge to rest.

Finely chop the vegetables. I’ve made them into fairly small dice, but the more traditional method is to cut them in thin slices. Whichever you choose they should be small enough to cook through evenly without any pre-cooking.

Mix the meat with the vegetables and season generously to taste with salt and pepper. There is no other added flavouring so don’t stint here.

Divide the pastry into six even pieces. Roll each disk out to a circle roughly 22cm/8 inches in diameter.
Divide the filling between them.
On each heap of filling place a generous sliver of butter.

Use a little of the beaten egg to moisten the edge of the pastry and fold one side over to meet the other.
Press to seal.
Now crimp the edges. Start at one corner and fold the bottom piece over and pinch it together all the way along the edge to make a good seal.
Brush the rest of the beaten egg over each pasty.
Pierce a hole in the top to allow steam to escape

Bake at 200C/400F for the first 25 minutes, then reduce the heat to 180C/350F for another 25 minutes. Allow to rest for about 5 minutes before serving, as they are hot! Also good eaten cold for picnics and haymaking.

Friday, May 09, 2014

Easter, Simnel Cake and Stuff

A rather rustic Simnel cake
Easter is all but a distant memory already, the only witnesses to it actually having happened are the three baskets still overflowing with chocolate eggs in the larder, which have to be shifted off my box of flour and dry ingredients every time I bake. Oh and the Easter trees still dangling decorated blown eggs, even though I told the kids that we’d take them down again the weekend after Easter.

April has gone by in flurry of life happening too fast. First George had biliary fever, (not unusual for young dogs living on a farm here where ticks are an inescapable part of life, but it can be fatal if you don’t treat it) which luckily we caught early enough for one visit to the vet to cure quickly. Then that was put out of our minds by Middle Daughter getting sick, and staying slightly sick with a low grade fever for over a week. The first visit to our GP/homeopath revealed nothing more than a sore throat, even with blood tests, the second visit with X ray and more blood tests had us despatched post haste to a specialist physician in the hospital. He dictated an overnight stay, as she had an atypical pneumonia, sneakily lurking at the top of one lung where it’s hard to hear.

Never having been in hospital with any of my children (since Middle Daughter’s fall from a kitchen counter as a 6 week baby, don’t ask! – even more scary than this occasion) it was both an experience I never want to repeat and one that we both found an interesting learning experience. She was feeling tired but not all that sick and was completely stalwart about the horrors of having an IV drip put in, not once but three times, when they couldn’t find a vein that would do; this after undergoing the earlier blood tests, where it took them four goes to get a vein, and two lots of blood type thumb pricking, which seems to be just part of the admissions procedure. There was a whole lot of waiting around, very nice friendly nurses, who got us into a single room, so that I could stay with her, even though she is now old enough to be in the adult ward. Then there was the fun of ordering from the menu for the next day and pretending we were in a posh hotel (for the cost of an overnight stay it certainly felt like we should be!).

The lunch menu

Luckily our physician was very sympathetic and let us go home the next morning with a huge goodie bag of antibiotics, nebulising capsules and probiotics, and she got progressively better. After another week off school she had recovered enough to gather her Easter bounty of way too many eggs without staggering under the weight of them all! And now she just gets irritated when we check how she’s feeling, as she is completely better, back to school, riding again, as if nothing happened. Thank goodness!

About to set off on a farm-wide Easter egg hunt

We always have a Simnel cake at Easter, with its balls of marzipan enclosing a heap of speckled eggs. It’s a family tradition, one that my mother used to make, though now she says she hasn’t made one for years. My brother in Australia went all nostalgic when he saw my picture of it on Facebook and asked for the recipe, so I’m sharing it here and have promised to make it for him when we meet up in the UK in July at my Mum’s for a family reunion. I always use Delia Smith’s recipe from her Book of Cakes, but over the years I’ve found a couple of little tweaks make a difference, so here is her recipe with my adjustments.

Simnel Cake Recipe
Ingredients
175g/6oz butter
175g/6oz sugar
3 eggs beaten
500g/18oz mixed dried fruit/fruit cake mix
zest of 1 orange and 1 lemon
225g/8oz plain flour
1 teaspoon baking powder
1 teaspoon mixed spice
3 tablespoons milk

Marzipan
350g/12oz ground almonds
350g/12oz icing sugar sifted
3 egg yolks
1 tablespoon lemon juice
1 tablespoon either brandy or sherry
1 tablespoon apricot jam
1 egg beaten for glaze

20cm/8inch cake tin lined and greased
Preheat oven to 150˚C 300˚F

First make the marzipan.
Combine the ground almonds and icing sugar in a bowl and mix well.
Beat the egg yolks with the lemon juice and brandy and mix the liquid into the dry ingredients.
Mix and stir and knead until it all comes together in a pliable ball.
You may need more lemon juice. Try not to overwork it with your hands as this can make the marzipan oily, especially on a hot day.
Divide the ball into three equal parts, wrap in clingfilm and keep cool until needed.

Now to the cake mixture.
Cream the butter and sugar until light and fluffy.
Beat in the eggs one at a time.
Fold in the dried fruit and orange and lemon zest.
Sift the flour with the mixed spice and the baking powder.
Fold the flour into the mixture, alternating with the milk. You may need another tablespoon of milk if the mixture is too stiff.
Spoon half the cake mixture into the lined cake tin and smooth it out so it is level.

Roll out one portion of the marzipan to fit the cake tin.
Lay it gently on top of the cake mixture.
Spoon on the other half of the mixture and level it out.
Bake in the centre of the oven for about 2 hours until the centre is firm and springy.
Cool on a wire rack

When the cake is cool, prepare the rest of the marzipan.
Roll one piece out to fit the top of the cake.
Divide the other piece into twelve and roll into small balls.
Brush the top of the cake with apricot jam.
Lay the circle of marzipan on top and press down gently.
Brush the top with beaten egg.
Make twelve small crosses (arranged like the hours around a clock face) with the point of a knife and fix the balls around the edge of the cake.
Brush them with beaten egg too.
Put the cake under a hot grill for just long enough to toast it to a golden colour, perhaps 5 minutes. Keep an eye on this as it is very easy to go dark tan rather than golden glow(see my picture!)
Cool and store in an airtight tin.

And just a few pictures of our early morning Easter egg hunt:


The final haul being audited and re-distributed where numbers aren't even.

Friday, February 14, 2014

5 Ways to Use Up Overripe Bananas

Smoothie ice lollies with banana and berries
I don’t know about you but in our family bananas are an all or nothing thing. Either the whole bunch gets eaten within two days of my weekly shop or else it sits there, forgotten, until it quickly crosses the line that my family consider to be no longer edible; i.e. skin slightly freckled, flesh slightly soft and sweet, what anyone else would consider perfectly ripe.

But once it reaches that point of perfect ripeness no-one would even consider slicing it onto their cereal or even mashing it into yoghurt for breakfast. I have to resort to cunning and stealth before the poor rejected fruit dwindles into a soggy weeping pulp in the bottom of the fruit bowl.

Luckily there are so many things that you actually need overripe bananas for that it isn’t too hard to use them up. However I’m often too low on brain power to remember them just at the right time, so I thought I’d share those 5 ways with overripe bananas here, in case you also get stuck.

Banana bread
Yes the same old, same old, answer when the whole bunch turns black and you have to use up four bananas all at once. But it’s good and easy and delicious and you can use up bananas that really are on the verge of translucent and liquid (don’t tell my kids that though!) This is the banana bread recipe I’ve been using for years, one of the first recipes I posted on this blog, and without a photo too.

Smoothies
In berry season we go mad with smoothies, using up all our slightly too ripe strawberries in lashings of smoothie goodness. Bananas are the perfect foil for the strawberry acidity, giving the resulting smoothie a thicker smoother texture and a full sweetness that doesn't need any extra sugar. Out of berry season I use the stash of berries from the freezer more sparingly, both strawberries and youngberries, adding them to whatever other fruits are in season and about to go past the point of perfect ripeness, including those squishy bananas of course.. Today it was a mango that needed bits cutting out of it, the other day some nectarines.

Nobody needs a recipe for a smoothie, but ours tend to have a good dollop of natural yoghurt and some milk to bring them to the right drinkable consistency. This picture is from when the girls had friends over and they decided to go the whole hog decorating their smoothies. They were more of a dessert to eat with spoon, but that makes them even better!

Fruit ice lollies
Home-made fruit ice lollies are great to have in the freezer when the kids get home from school on a hot summer day. If I was super-mom I’d have them ready every day, but as I’m not it’s an occasional flash of brilliance rather than a regular occurrence. But I made them today with my berry smoothie mixture and am just keeping fingers crossed that they’ll have frozen hard enough by the time the kids are home as a Valentine’s Day treat.

This batch of five lollies was made with 1 ripe banana, ½ an overripe mango, ½ cup of frozen strawberries, ½ cup of frozen youngberries, ½ cup of yoghurt. Whizzed till smooth in the food processor and spooned into ice lolly moulds. That's the picture of them up top, and they froze hard in two hours, just in time to counter the back from school snack desperation.

Yoghurt muffins
Muffins that include yoghurt and oats have to be healthy, even more so with a mashed up banana and some berries or apple chunks inside. These are one of my snack stand-bys for when the kids have friends over, as they’re easy to throw together and are good and sustaining too. I like them best on the day they’re made, but they last well and don’t dry out. The only downside is that they only need one mashed banana. Here's the yoghurt oat muffin recipe and this is from when I first discovered the joys of these outrageously healthy muffins.

Buttermilk pancakes
These are my only concession to making cooked breakfasts, usually brought out when the kids have friends sleeping over, or for weekends when I’m feeling all halo-ish. The banana really does have to be nice and soft for these little pancakes, so you positively want them overripe. Here is the pancake recipe, which originally comes from Nigella's Feast

What do you do when you have a bunch of overripe bananas? Do share your favourite recipes in the comments. I'm always looking for new things to try!

Friday, January 24, 2014

Rock Buns at the River

A cup of tea, a rock bun and a canoe - relaxing by the Breede River
Ever since the dawn of time, holidays at the Breede River have been synonymous with rock buns. In my husband’s family at least. 

Nostalgic memories of long ago winter holidays snug in a caravan on their family plot with an apparently endless supply of the fragrantly spiced buns (how did they manage that endless part?... any time I bake them they disappear within 24 hours!) are part of his family history, enduring long after the plot was sold, the family grown up and scattered.

The River continues to exert its pull and our family holidays have been taken there ever since we moved back to South Africa, albeit in a series of rented houses, so the family rock bun recipe has been added firmly into my repertoire, to be baked several times over the course of a holiday, as long as the ingredients last.

Nutmeg and mixed spice, dried fruit mix and a light cakey mixture, they have some of the flavours of Christmas without the heaviness and are perfect to go with early morning tea when a swim or canoe ride are planned before breakfast, or to go with a cup of tea anytime really.


Rock Bun Recipe
Makes 12

2 cups (500ml) self-raising flour (or plain flour + 2 teaspoons baking powder)
pinch salt
½ teaspoon nutmeg
½ teaspoon mixed spice
125g / 4 oz butter
½ cup sugar
¾ cup mixed dried fruit / fruit cake mix
1 egg
2-3 tablespoons milk

Preheat the oven to 175˚C / 350˚F

Sift together the flour, salt and spices.
Cut the fridge- cold butter into dice and rub them into the flour, until the mixture looks like breadcrumbs.
Stir in the mixed fruit and sugar.
Beat the egg and milk together then stir it into the dry ingredients.
Mix till it starts clumping together. Use a bit more milk if it is still too dry.
Place in rough heaps on a greased baking tray.
Bake for 15-20 minutes until light golden brown.
Cool on a rack or eat warm.

And best bake a double batch while you’re about it, as they will disappear in a trice.

I thought I hadn’t put this old family favourite recipe on the blog yet, but I proved to be wrong. I wrote about baking rock buns on a very hot summer night back in 2009 for a class bake sale, and once at the very beginning of my blog in 2006 for my husband to take to a family wedding. I was rather light on photos back then, so hope you don’t mind the re-run with the ultimate river rock bun pics taken on our recent flooded holiday there. Just goes to show that the best recipes stand the test of time!

Wednesday, December 11, 2013

Youngberry Blondies Recipe - The Season of Berries and Jam-Making

Youngberry Blondies
For the last few days I’ve been leaping out of bed before 6 o’clock, even without the tyranny of the school run to blame. This time it’s the berries that are dragging me out, berries that urgently need picking while it is still cool. This recent blast of summer has 8am feeling like noon, and berry picking in the heat is no-one’s idea of fun.

So the dogs and I sneak out while the others are still dozing, sometimes while there is a veil of sea mist wafting over the hill behind us to take the edge off the warmth of the rising sun. It's delicious to feel a shiver of cool air and I don't bother taking a jacket. We walk around our ring road for dog walk exercise and then stop at the veggie garden to fill an ice-cream container of youngberries.

At least I do that, while George flattens the carrots by rolling on them or digging for moles, or tries to roust out a hare or two to play chase. The older dogs find a shady spot to loll in, occasionally give up on me, as I switch from youngberries to strawberries, and wander back home. Then I grab a bunny bouquet of rocket, nasturtiums, milk thistles, cabbage leaves and spinach, along with the George-flattened carrot tops and walk home laden with good things, to swirl through the kitchen door virtuously, as the sleepy family is dipping into breakfast.


Strawberries are made into jam and youngberries are frozen to make berry muffins and summer pudding for the rest of the year. In fact we’re only just reaching the end of last year’s berry supply, so I’ve been generously baking muffins on every social occasion.

And I’ve found an absolutely irresistible new baking way with youngberries. It started off as Nigella’s Blondie recipe. Hers had chocolate chips in, which I haven’t tried despite my chocoholic tendencies; but I can tell you, that with youngberries instead of chocolate these are truly sublime and horribly moreish. They would work with any berries, but the sharp/sweet jamminess of the cooked youngberries is hard to beat.


Youngberry Blondies Recipe
(adapted from Nigella's Blondies recipe)

Ingredients
200g / 7oz porridge oats
100g / 3.5 oz plain flour
½ teaspoon bicarbonate of soda (baking soda)
150g / 5oz soft butter
100g / 3.5 oz muscovado sugar (I mix treacle sugar and brown sugar)
1 x 385g / 13oz tin condensed milk
1 egg
1 cup frozen youngberries

Baking tray or pyrex dish 30x20x5cm (12x8 inches)approx, lined and greased
Oven 180°C

Mix together the oats, flour and bicarb.
Beat butter and sugar until light and fluffy.
Beat in condensed milk.
Add the oats mixture.
Beat in the egg.
Carefully mix in the frozen berries. If they are already de-frosting they will make gory splashes of red in the mixture, so it’s easier to do this straight from frozen. Or else you can use fresh berries.
Dollop the mixture into the tray and level it out roughly.
Bake for about 30 minutes until the top is a deep gold, but the middle is still slightly wobbly. It will firm up as it cools. You want it to be moist and almost gooey inside and deliciously crusty on the outside.
Once cool, cut into squares and devour without restraint.

These are perfect for the festive season, whether you are celebrating in winter or summer, the only trouble being that there are hardly ever any left for the next day!

Youngberries are like blackberries but with a livelier flavour


If you prefer chocolate chips to berries, here is Nigella's recipe on Gorgeous Gourmet's blog.

Tuesday, November 12, 2013

Lavender


When we built our house I knew I wanted a lavender hedge along the front. There is something about lavender bushes all in a row that feels good. Think how we love those pictures of Provence with fields of lavender stretching in the distance towards ancient abbey buildings. Part of me was after that heart-lifting feeling, the other practical part fixed on lavender’s antibacterial properties as a justification. Because it is a very useful plant in herbal medicine and household remedies.

According to Margaret Roberts, my favourite South African herb guru, lavender helps ward off fleas, flies, fishmoths and cockroaches – there was a reason for our grandmothers using lavender bags tucked into drawers of clothes and linen. I’ve been tucking bunches of fresh lavender behind books on shelves and into drawers for years now, except I’m not patient enough to sew it into bags, so tend to end up with lots of dried lavender flowers sprinkled all over the bottom of drawers months later. But it smells nice, so I don’t mind.


Lavender Tea
One of my favourite ways to use lavender is as a relaxing tea, when I’m stressed or anxious. It has a lovely calming effect and I quite enjoy the rather perfumey taste. Try it for insomnia too. It’s also a good antispasmodic, so eases headaches, muscle aches and stiffness. Plus lavender has antiseptic properties, so a tea is useful for washing out scrapes and scratches, and for cleansing oily skin. And it’s good as a hair rinse for hair bothered by the oily scalp of adolescence!

To make lavender tea, simply pick quarter of a cup of flowers, pour over a cup of boiling water. Leave to steep for five minutes. Then remove the flowers (or leave them in if you prefer) and sip.


Lavender Play
Our lavender hedge, ten years on, is getting very ragged and uneven with bare patches here and there. Youngest found it a perfect place to play with her horses and figures, creating gardens and landscapes in the shady secret gaps. A few months ago, when it was still winter, I announced that it was time to dig out the hedge out and start again with new little bushes. She was horrified, “But that is where I play.”
I let it rest for a week or two before bringing it up again. She then, in a very grown-up way, suggested,
“Can’t you leave it till next year. This is probably the last year I’ll be young enough to want to play in the lavender and if you plant new ones now they won’t be big enough to play in before I’m too old.”

How could I argue with that poignant plea. The lavender hedge remains. The fairy/horse landscapes haven’t been refreshed for a while now, but the space is still there for her last fling with childhood. Sigh.


Wild forests in the making
for these guys to explore and roam free
ancient twisted trees and magic groves
and they make great places for kittens to stage ambushes from
Lavender recipes
Here are two recipes that use lavender flowers for a subtle and elegant flavour, perfect for something different at Christmas, something that’s not spice, chocolate or rich dried fruit, to give your tastebuds a spot of light relief!


Note: There are lots of different varieties of lavender. The best to use for medicinal and cooking purposes are the varieties usually sold as English lavender Lavandula angustifolia or lavandula intermedia.

Monday, September 16, 2013

Old-fashioned Ginger Cake

Sometimes the old recipes are the best. No tweaking, no ‘making it my own’ was needed for this lovely moist, aromatic  ginger cake.  It’s one I used to make many years ago and that my mother made quite often, but I’ve no idea where the recipe originally came from.

I haven’t baked it since long before the kids arrived, so it was totally new to them. I wasn’t sure if they’d like it, even though I loved it as a child. “Strong” was Youngest’s comment, as she first tasted it, but she ate it happily and the next day followed her older sister in drenching a slice with cream and eating it as a pudding. The only person who wasn’t that keen was my husband... but I’ve forgiven him.

It’s an easy recipe and quick to throw together, but slow to bake, which is lovely on a chilly wintry weekend, when the house fills with muted spicy scents as the cake slowly bakes to deep bronze perfection, and the oven makes a wonderful warm leaning post as you inhale the aromas. The cake remains moist and stickily chewy for days, so if you can resist eating it all up on the weekend it makes a perfect cake to eat slice by slice through the week. And there’s no need to ice it either, in fact icing it would cover up that lovely caramelly crust which is all part of the allure.

To be entirely truthful, I did make a small tweak – not having any treacle sugar (molasses sugar), I substituted a tablespoon of molasses for that amount of golden syrup and used regular brown sugar. I’m not sure how much extra treacly richness that added, so I’m going to have to bake it all over again with treacle sugar to check which I prefer, but in the mean time here is the recipe.


Ginger cake recipe
115g / 4oz butter
230g / 8oz golden syrup
½ cup milk
2 eggs
115g / 4oz treacle sugar (molasses sugar)
230g / 8oz self-raising flour (or plain flour + 2 tsp baking powder)
2 teaspoons ground ginger
1 teaspoon mixed spice

Preheat the oven to 120°C / 250°F
Grease and line the base of a 20cm/7inch round cake tin.

Melt the butter and syrup together. Stir the milk into it.
Sift together the dry ingredients.
Beat the eggs in a large bowl.
Pour the melted mixture over the eggs.
Mix in the dry ingredients.
Pour into the tin.
Bake for about 1 ½ hours until the top is firm and springy and a skewer comes out clean.
Cool on rack.

Devour when craving richness and spice in your life.